The SDcard is used primarily to boot the replay. ie: When the Replay powers on etc, eventually it looks to the sdcard for software to load or boot up like a real computer. Basically, the SDCard it has to be formatted fat32 and then usually whats known as a core is loaded into the system or memory of the replay if you like so as to run different operating systems or games etc. eg: Commodore64 or Amiga / AtariST or Amstrad etc. It also uses what is commonly called .ini files which is like a .bat or script file in which it not only loads the Core or and OS it tells the replay how and what to boot up after the initial power on is complete, basically this .ini file loads and configures each core and dependent files which might also be rom or audio / gfx even arcade dipswitch settings etc, its like the control and defaults of the core, it even changes and configures the OSD menu differently depending on each core loaded…See the following information below to see how to setup an example of an Amiga sdcard to boot for gaming or the workbench.
Note: If you don’t have an SDcard in the replay when you power it on, it will come up with a default replay picture telling you to insert an SDcard.
*—————————————————*
How you setup the sdcard is as follows.
This is a general idea of how to setup a replay board for booting in this example an (Amiga core).
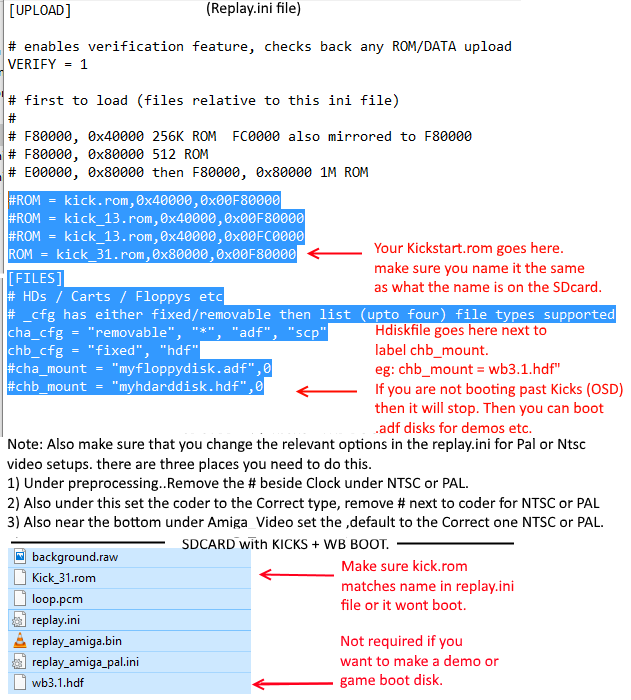
Ive included a picture at the bottom of this post which shows what as an example the sdcard contents should look like or the relevant parts required in this example of it only, for a full example of the Amiga .ini click here.
Basically you can see the kick_31.rom there and the (harddisk wb3.1.hdf) file at the bottom. If you are making a bootdisk for gaming or demos, you don’t need the wb3.1.hdf.
Now assuming that you have copied your wb3.1 roms onto the sdcard or and your wb3.1.hdf, and the contents of the Amiga.sdcard which you will download from the website see the below links, you just need to make sure that in the replay.ini file, that you rename your kick3.1.rom so it reflects the same naming otherwise it wont boot as shown below.
See this picture attached again, at the bottom as an example. Obviously you need to follow the bottom steps to go on and create a proper working workbench set of disks which you will install complete.
*——– Source Amiga and other SDCARD boot files required below ———-*
See firstly the docs section on general setup of the SDcard.
https://docs.fpgaarcade.com/guide/replay1/sd-setup.html#loader-core
The latest Amiga sdcard content files minus the WB3.1 and Roms3.1 from the Github..
https://github.com/FPGAArcade/replay_release/tree/master/amiga
The Latest Firmware is also in the Github again below..
https://github.com/FPGAArcade/replay_release/tree/master/firmware/replay1
This can be updated by using the App there and running it from the OSD menu.
Also lastly, here are instructions on how to upgrade the firmware of your replay.
https://fpgaarcade-docs.netlify.com/guide/replay1/firmware-upgrade.html#upgrade-via-sd-card
*———————————————*
Also the below shows you how one rough example of setting up a sdcard partition with workbench.
Creating the hdf and installing the 3.1 files complete install.
Assuming you have setup winuae on your pc etc.
Also note, make sure you have the complete set of 3.1 disks on sdcard.
1) Firstly create a hdf ridged disk block 500meg file in winuae and save it to your sdcard.
2) Next, boot on the fpgaarcade into OSD with a default replay sdcard and then load and boot the amiga 3.1 workbench.
3) Next, load extras from osd and navigate to the hdtoolbox and run it.
4) Then, create partition(s) dh0/dh1. Change max transfer to 0x1FE00 to stop write or read errors oddities both partitions.
5) Put back sdcard in pc and after opening winuae again, select to add in your again hdf from the sdcard and rom file.
6) Next, select to also mount floppies wb3.1 workbench & extras then start and boot to the workbench desktop.
7) Next, when your new hdisks appear, format them both dh0/dh1: with workbench quick format + rename.
8) Next, install a complete 3.1.x set of disks onto the new hdisks from the extras hdinstall.
9) Now change replay.ini so it reflected this chb_mount = “wb3.1.hdf”,0
10) Next, now put sdcard back in replay.
Reboot and if all works, it loads straight into workbench complete.
*——————————————–*
And example Amiga core.ini file showing certain parts required to load the Rom and also Floppy disks and Hard disks.
Note: Again for a full example of an .ini file for in this case the Amiga core, you can view this here.
Note: In the most recent AGA and 060 cores, the “replay_amiga.bin” has been replaced with “replay_amiga.bit and the same goes for the 060 core, it it now called, “replay_amiga_68060.bit”. Make sure you update your sdcards accordingly and also update the replay.ini files with also the correct bit file. eg: AGA (bin = replay_amiga.bit) and 060 (bin = replay_amiga_68060.bit). Also note that you cannot mix the .ini files or the core files etc, they are very different.

*1 Note, background.raw is only required for the loader core (you can change the background picture)
*2 The system boots replay.ini – although if replay.ini points at loader, or another design with OSD, then you can choose another .ini from the menu system.
*3 replay_amiga_pal.ini is the same as replay.ini except for the base clock settings. You only need to use this if you want accurate PAL clocking, or you are using composite / svideo output.